

Accept and sign a retainer
Signing turns a proposal into a retainer. Two separate actions are involved and they do different things: accepting commits you to the terms and locks the numbers, and signing puts your signature on the agreement and freezes the document.
Before you start
Section titled “Before you start”The Accept button will not proceed until four things are done, and it tells you which one is outstanding:
- A phone number on your account. Canadian and US numbers need an SMS code first.
- Identity verification completed. It starts from the proposal itself — stay on the page while it runs, and Accept unlocks when it finishes.
- Spouse and dependent details filled in, if the proposal covers them.
- A saved payment schedule.
Accept the proposal
Section titled “Accept the proposal”- Open the proposal and go to the Acceptance section.
- Tick each confirmation. There are four, and a fifth if the application is processed from outside Canada — a declaration that you are not a resident of Canada and are exempt from Canadian taxation under applicable tax laws.
- Select Accept Proposal.
The four standard confirmations are that you have read and understood all sections of the proposal, that the information you provided is accurate, that you understand the fee structure and payment schedule, and that you agree to the terms and conditions.
If you would rather talk first, Book a Call First sits beside the Accept button and does not commit you to anything.
After accepting, the Acceptance section reads Agreement accepted and asks how you want to sign.
Sign here
Section titled “Sign here”Choose Sign here to draw with your mouse or trackpad. Draw in the pad, then select Submit Signature. If the pad misbehaves or your session has been open a long time, New Signing Session starts a fresh one.
Sign on phone
Section titled “Sign on phone”Choose Sign on phone to sign with your finger instead. This option only appears when you are on a computer — on a phone you draw directly.
- A QR code appears, with the minutes remaining beneath it.
- Scan it with your phone. A single-purpose signing page opens — no sign-in, the link itself is the key. It shows the document title and Signing as your name.
- Draw in the box and select Submit Signature. Clear signature starts the drawing over.
- The phone confirms Signature submitted and tells you that you can close the page.
While you draw on the phone, the computer shows your strokes appearing live and reads Drawing in progress on your phone. You do not need to refresh anything.
If the link has expired, been used already, or is not valid, the phone page says so rather than failing silently. Select New QR Code on the computer to generate another.
The moment you sign
Section titled “The moment you sign”Three things happen as soon as the signature is submitted:
The document is frozen. Everything the proposal displayed — your details, the firm and the representative, the scope, the fee breakdown, the payment plan, the applicants, the processing-time estimates, and every clause of the terms — is captured as a stored signed document. From then on the proposal page shows that stored version, not a freshly generated one. Later changes to templates, pricing, or firm settings cannot alter what you signed.
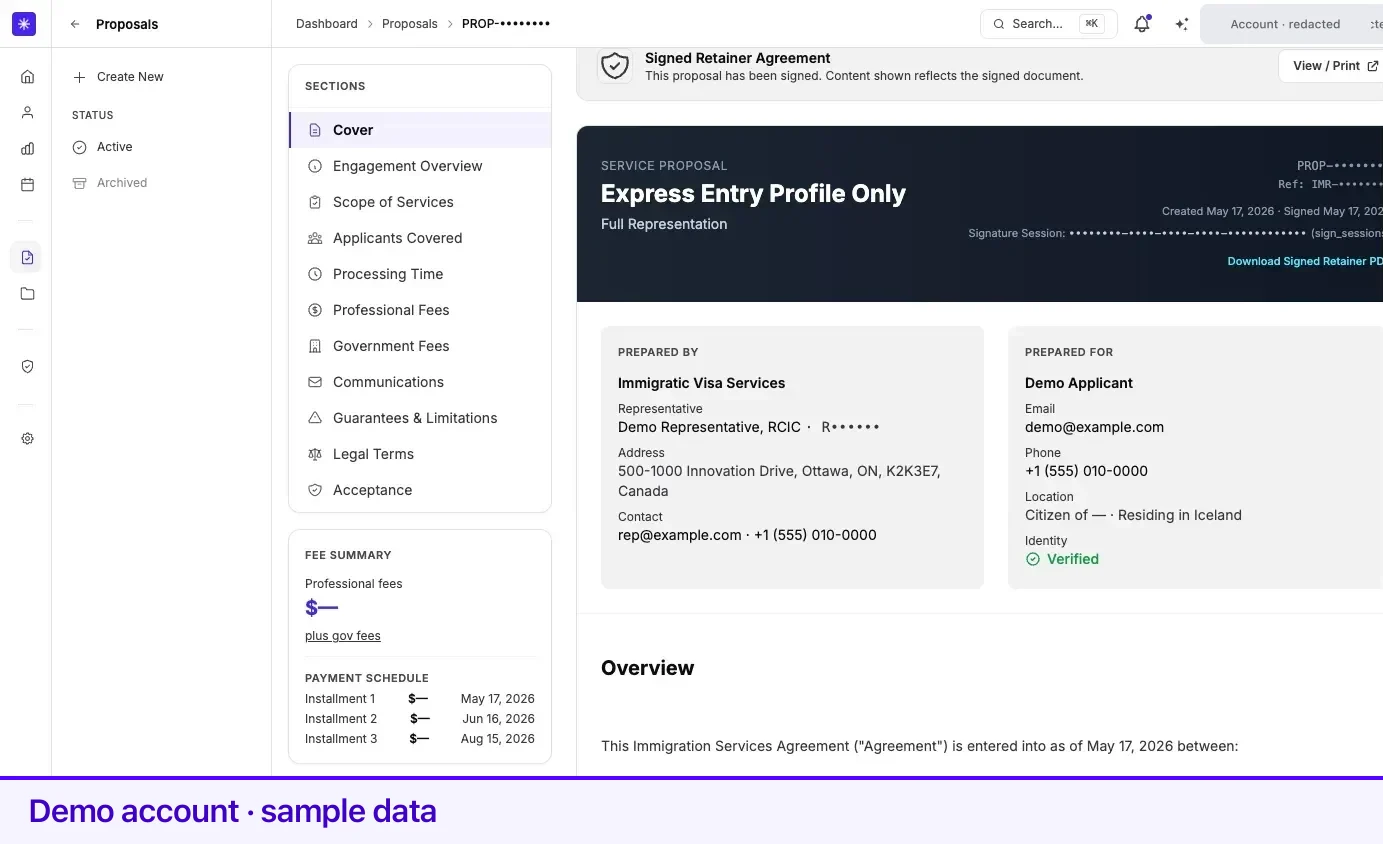
The signed retainer becomes available. A Signed Retainer Agreement banner appears with a View / Print button, and a Download Signed Retainer PDF link appears on the cover. The cover also gains a signature session reference, which is the record that ties your signature to this document. Only the account that owns the proposal can open either.
The next step becomes payment. The tracker moves to Pay Deposit and the section reads Signature complete. Your case does not open yet — see Payments and invoices.
If the proposal covers a spouse or dependents whose family records are incomplete, Complete family details appears where Pay … Deposit would be. It scrolls to Applicants covered, where each card lists what is missing after Needs and Complete details opens a window to fill it in. The pay button returns once every gap is closed. The full list of checks is in Understanding your proposal.
Where no payment is due from you — an engagement funded entirely by a school or employer, for example — signing alone activates the retainer, and you are taken straight to the case setup screen instead of a payment step.
Related
Section titled “Related”- Understanding your proposal — read this before you accept
- Payment plans — the schedule that acceptance locks
- Payments and invoices — the step immediately after signing
- Cases — what opens once the retainer is active
Frequently asked questions
Can I change the payment schedule after signing?
No. Accepting locks the payment schedule, and signing freezes the whole document. Set the schedule while the proposal is still in the Review stage.
The QR code stopped working before I signed. What now?
Signing sessions expire. On the computer, select New QR Code to generate a fresh one. The phone page will say the link has expired and to request a new one from your desktop.
Where do I find the signed agreement afterwards?
On the proposal itself. A Signed Retainer Agreement banner appears with a View / Print button, and a Download Signed Retainer PDF link sits on the cover. Only the account that owns the proposal can open it.